With thrift flipping and DIYs all around, we have rediscovered the importance of sewing as a skill. Being able to create your own clothes, and bring your designs and style to life, is a great feeling. However, before getting to that stage, you need to learn the basics.
Learning how to sew can be a little difficult. Your first few projects might not look great or fit right. That can be very demotivating and may feel like a waste of time.
Here are a few basic tips to consider as a beginner at sewing:
Pick your fabric carefully. Pick a strong fabric that can withstand and forgive mistakes.
Avoid slippery, satin-like, or silk fabrics when starting. They move a lot while cutting which makes things harder for a beginner. They also tend to tear or fray.
Keep a lot of extra thread, needles, and any other materials handy. Running out of materials mid-project often leads to abandoning the project.
Trust the process! Sewing can seem strenuous at first. The initial steps or pieces don't always make sense till they form the final product but keep at it.
To keep you going on your sewing journey, follow the steps to make these simple sewing projects:
1. Scrunchies
Scrunchies are stylish, convenient, and most importantly, very easy to make.
All you need to make scrunchies:
Supplies for making scrunchies
A small piece of elastic, the size you want your scrunchy to be. I usually use the size of my wrist for reference.
A straight piece of cloth, around 2 inches in width and twice the length of your elastic.
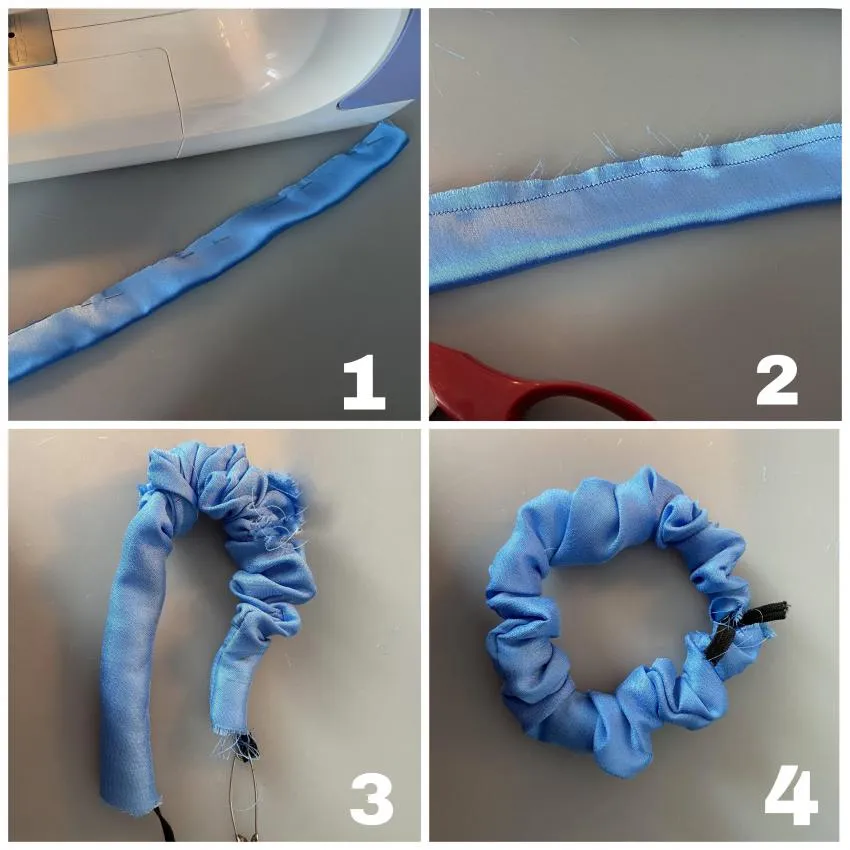
Steps to making scrunchies:
Steps to make a scrunchy
Fold the piece of cloth lengthwise, right sides together.
sew the open edge shut, and flip it inside out
Thread the elastic through the loop. You can attach a safety pin on one side of the elastic to help you get it through
Tie the two ends of the elastic together, and tuck it in under the fabric
Adjust the folds of the fabric and trim off any excess threads.
You can sew the ends shut by hand if you want, or do what I did and hide your mistakes and open ends.
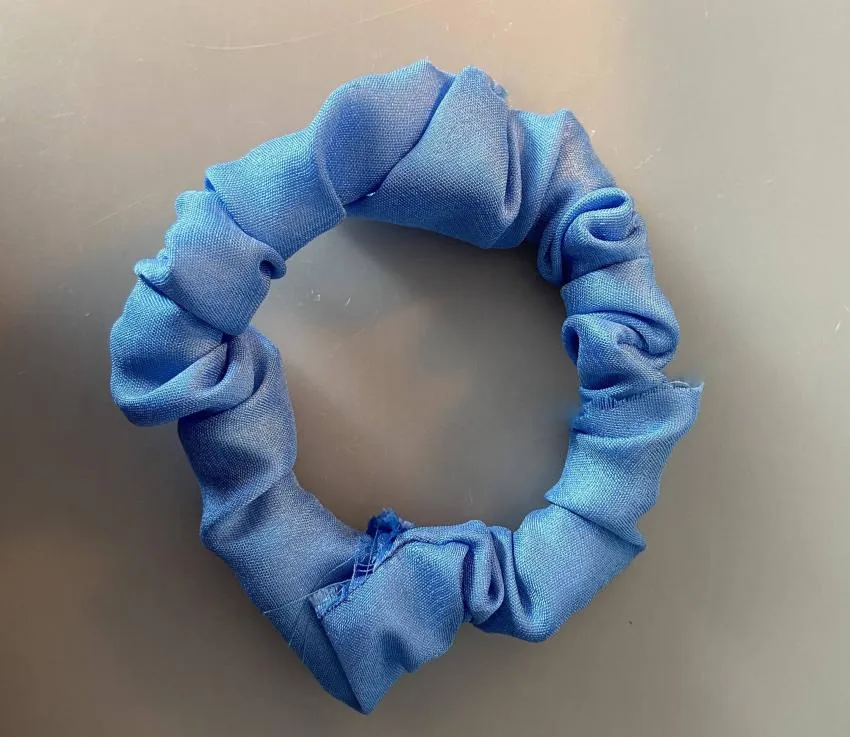
You’re done!
2. Circle Skirts
Circle skirts are probably the quickest and easiest garment to make. This project is a great way to practice cutting patterns and hemming. I recommend practicing on a doll first, to get a hang of the fabric cutting.
All you need to make a circle skirt:
a square piece of fabric
a pair of scissors
a drawstring
Steps to make a circle skirt:
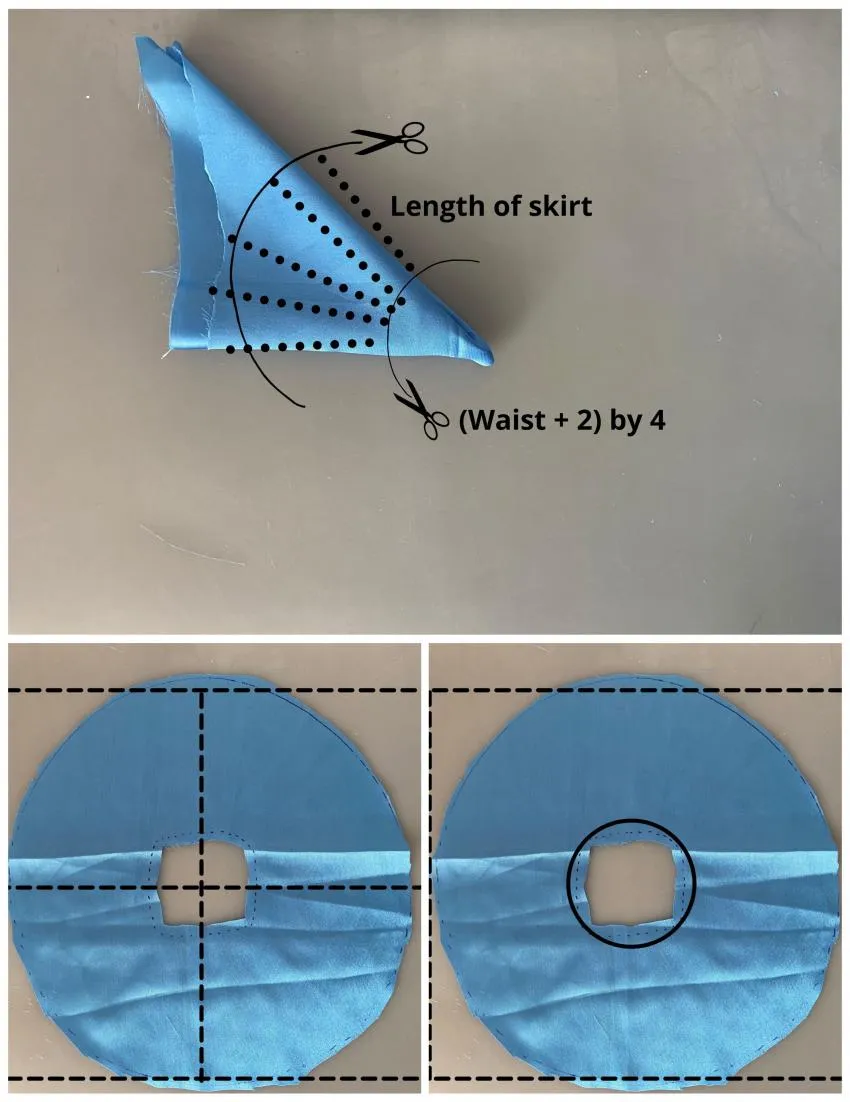
Start by folding your square fabric in half, creating a triangle
Fold that triangle in half
Fold the triangle in half again
Folding Pattern for a circle skirt
Take the measurement of your waist, add 2 inches. This will the radius of the top of your skirt.
Divide this radius by 4, and mark it on the top corner of your triangle.
Mark the length of your skirt from the top corner. Draw a curve at the bottom using this length.
Cutover both these curves and unfold the fabric. You should have a large circular piece of fabric, with a small circle cut out in the center.
Fold and pin down the edges of the inner circle, creating a channel for the drawstring.
Cutting a circle skirt
Sew this channel in place and cut 2 small slits for the string
Thread your drawstring through the channel.
Try it on and use the drawstring to adjust the size
You can choose to hem the skirt to your liking. This provides additional stability to the garment and is a good basic to practice.
There you go! A cute skirt to twirl around in
3. Cushions
Who doesn't love cushions! They can spice up any room and happen to be very easy to make.
All you need to make a cushion:
2 identical pieces of fabric. (It's good to start off with a square or rectangle, but you can explore other shapes once you get the hang of it)
Cotton or some other soft stuffing
Steps to make a cushion:
Place the 2 pieces of fabric on top of each other, right sides facing each other.
Sew over 3 sides, leaving one side open.
Flip your fabric inside out, so the right side is facing outward.
Stuff the fabric with your cotton
Sew the open side closed
Trim off any excess fabric or threads
Hug the cushion because you're done!
4. Mermaid Tail Blanket
This project is a great way to reuse old blankets and practice sewing.
All you need to make a mermaid tail:
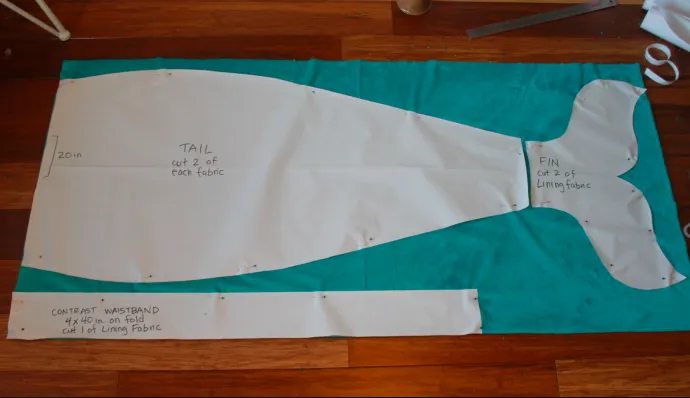
a piece of fabric large enough to cover you. An old blanket works well.
Paper cut out of a mermaid tail. If you do not have large enough paper to draw the whole thing, try to at least get a stencil for the fin.
Steps to make a mermaid tail blanket:
Fold the fabric in half
Lie down on the folded fabric and mark your height. Leave extra space at the bottom for the mermaid tail fins
Draw out the general shape of a mermaid tail and cut it out
Place the 2 pieces of fabric on top of each other, right sides facing each other.
Sew around the edges and flip inside out when done.
You can cut semi-circles out of fabric to make scales or simply paint them onto your tail
Slip your legs into your new tail!
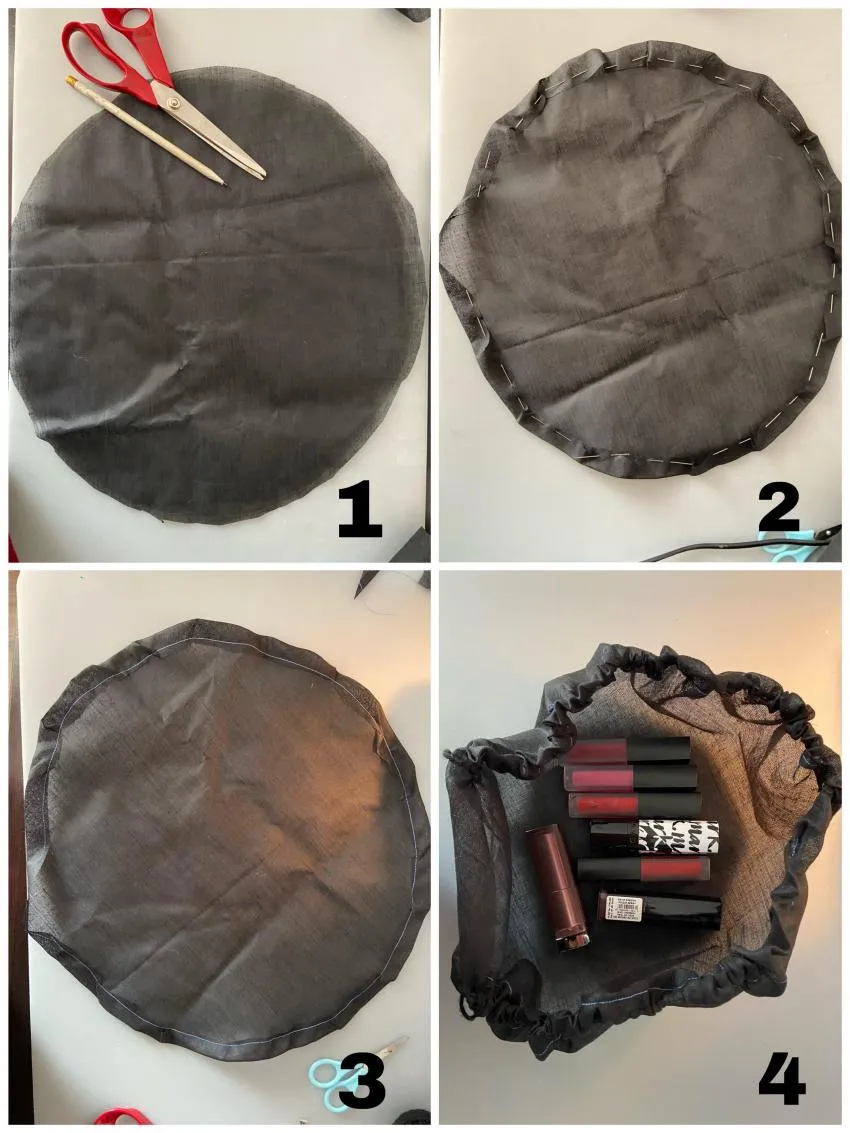
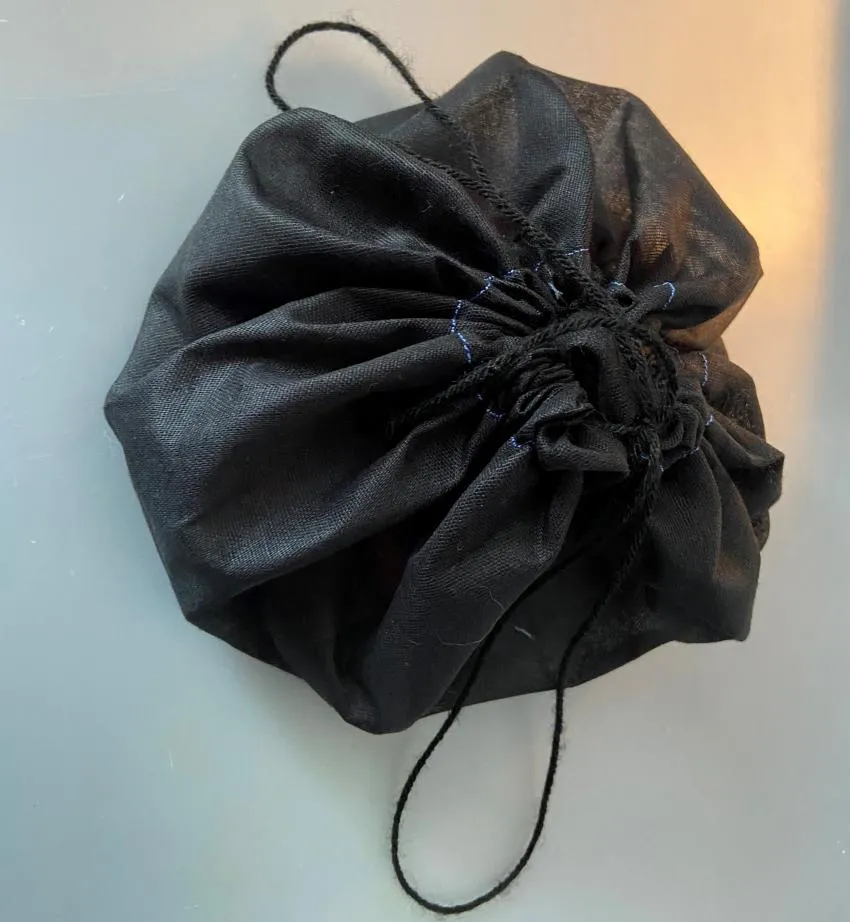
5.Travel makeup bag
A cute pouch to carry small makeup items is a great way to stop them from getting lost.
All You need to make a travel makeup bag:
A medium-sized piece of cloth
A drawstring
Steps to make a makeup bag
Steps to make a travel makeup bag:
Cut your fabric into a circle
Fold the edges inward, about half an inch. Leave a small gap so you can thread the drawstring through.
Pin the folded edges down and sew it in place, creating a channel all around your fabric.
Insert your drawstring through the gap, with the help of a safety pin.
Thread the drawstring through the circle, till it comes out the other side.
Pull-on the 2 ends of the drawstring to pull your bag together and close it.
Put your makeup in and you are good to go.
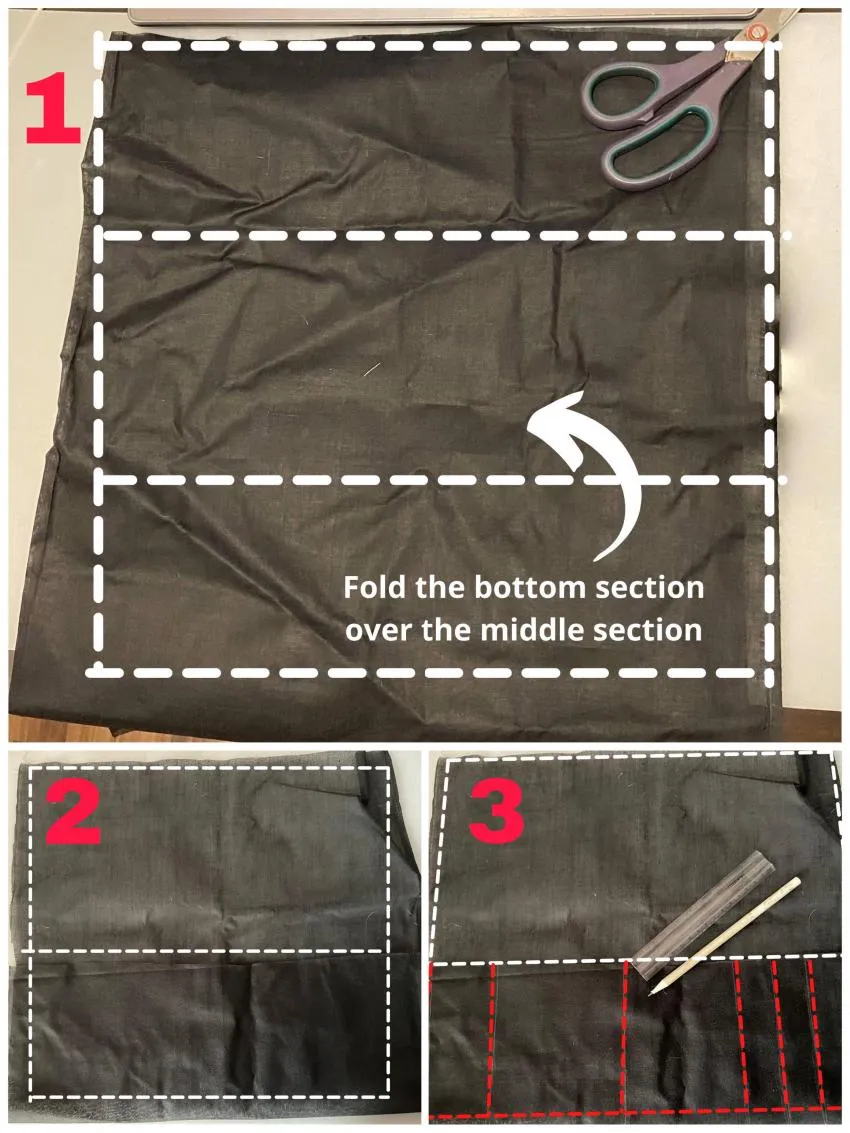
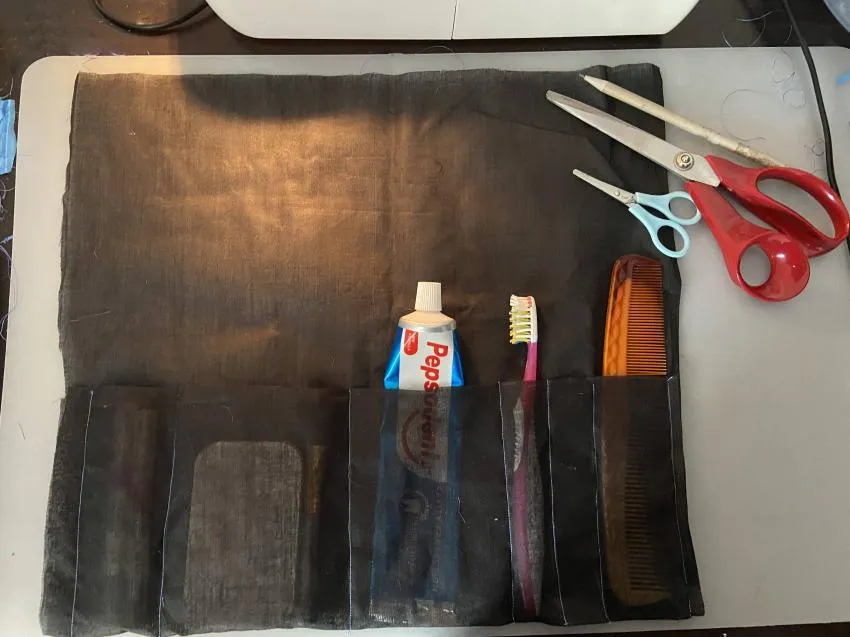
6. Travel toiletries kit
Toiletries tend to get lost in large bags, but it is super easy to create a small pouch to hold them in place.
All you need to make a toiletries kit:
A rectangular piece of fabric
Steps to make a toiletries kit:
Simple sewing pattern for a travel kit
Divide the piece of fabric into 3 equal parts
Fold the bottom section over the middle section, creating a small pocket.
Sew the sides of the fold, to hold it in place
Draw sections on the folded cloth with a pencil.
Sew over the lines you made to create these sections, this is also a great way to practice sewing straight.
You can now put your small toiletries into these sections, ready to go.
DIY Travel kit for toiletries
All of these projects will help you practice the basic facets of sewing, including sewing straight lines, hemming, creating channels, cutting, and more. They don't have to be perfect, but these practice projects leave you with a small token for your effort.
Love these beginner-friendly projects! I started with scrunchies last month and it's amazing how quickly you can make them once you get the hang of it.